How to enable Access Time Tracking for the Azure Storage Blob service
To manage storage costs, it can help to organize your data based on how often it will be accessed. Azure offers us different levels of access to store blob data most cost-effectively, depending on how we use it. In this post, I want to show you how to enable last access time tracking for the Azure Storage Blob service using PowerShell and the Azure CLI. Last access time tracking integrates with lifecycle management and allows us to automate through a rule-based policy the transition of data to the desired access level when specific conditions are met, such as the last access date. Note that the last access time can also be used, without lifecycle management, by any third-party solution that needs to know when individual blobs were the last read and then take action. Important: Currently, access trace logs are updated daily and are limited to block blobs only.
Prerequisites
- Check that you have the latest version of the Az.Storage module.
Azure PowerShell Workaround #
Check out this link if you want to know how to install the PowerShell Azure module on your machine. The simplest way to get started is to sign in interactively at the command line.
Connect-AzAccount
This cmdlet will bring up a dialog box prompting you for your email address and password associated with your Azure account. If you have more than one subscription associated with your mail account, you can choose the default subscription. To perform this task, we will use the following commands:
Get-AzSubscription
Select-AzSubscription -Subscription "My Subscription"
Once you set your default subscription, you’re ready to start.
Set the variables #
Here we define our environment’s characteristics and the resources’ names.
$resourceGroupName = "RG-DEMO-NE"
$storageAccountName = "storageaccountdemone"
Check current settings #
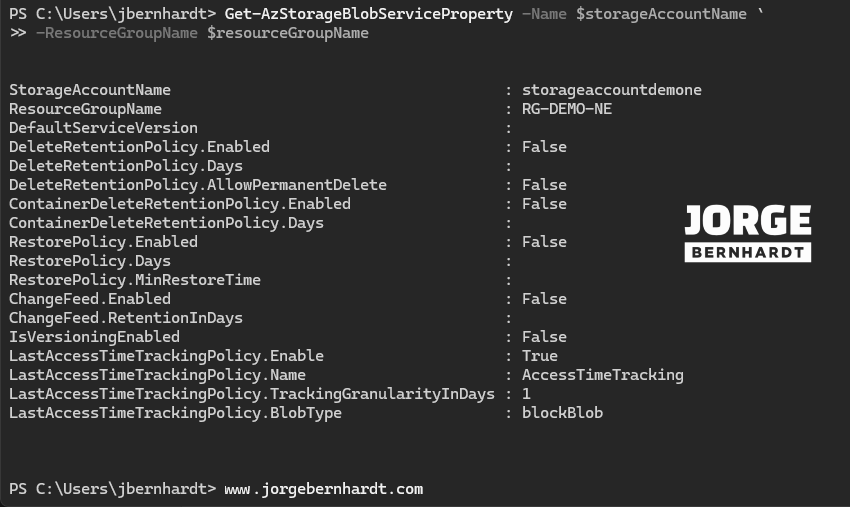
First, we check the current configuration. To do this, you should use the Get-AzStorageBlobServiceProperty cmdlet with the following syntax.
Get-AzStorageBlobServiceProperty `
    -Name $storageAccountName `
    -ResourceGroupName $resourceGroupName
Enable access time tracking #
After the checks are complete, use the Enable-AzStorageBlobLastAccessTimeTracking cmdlet to enable last access time tracking on the Azure Storage Blob service.
Enable-AzStorageBlobLastAccessTimeTracking  `
    -ResourceGroupName $resourceGroupName `
    -StorageAccountName $storageAccountName
When last access time tracking is enabled, the blob property called LastAccessTime is updated when a blob is read or written. We perform the verification again to verify that the change was made correctly.
Get-AzStorageBlobServiceProperty `
    -Name $storageAccountName `
    -ResourceGroupName $resourceGroupName

Disable access time tracking #
To disable access time tracking, you should use the Disable-AzStorageBlobLastAccessTimeTracking cmdlet, as shown in the following example.
Disable-AzStorageBlobLastAccessTimeTracking  `
    -ResourceGroupName $resourceGroupName `
    -StorageAccountName $storageAccountName
Azure CLI Workaround #
In this case, we will use Azure Cloud Shell, a browser-based shell built into Azure Portal. This allows us to use the Azure command-line tools (Azure CLI and Azure PowerShell) directly from a browser. If you want to know more about Azure Cloud Shell, check out this link. Here we define our environment’s characteristics and the resources’ names.
resourceGroupName="RG-DEMO-NE"
storageAccountName="storageaccountdemone"
Check current settings #
First, we check the current configuration. To do this, you should use the following command.
az storage account blob-service-properties show \
--resource-group $resourceGroupName \
--account-name  $storageAccountName \
--query "lastAccessTimeTrackingPolicy"
Enable access time tracking #
After the checks are done, use the following command to enable last access time tracking on the Azure Storage Blob service.
az storage account blob-service-properties update \
--resource-group $resourceGroupName \
--account-name  $storageAccountName \
--enable-last-access-tracking true
When last access time tracking is enabled, the blob property called LastAccessTime is updated when a blob is read or written. We perform the verification again to verify that the change was made correctly.
az storage account blob-service-properties show \
--resource-group $resourceGroupName \
--account-name  $storageAccountName \
--query "lastAccessTimeTrackingPolicy"

Disable access time tracking #
If you want to disable access time tracking, you should use the following command, as shown in the example below.
az storage account blob-service-properties update \
--resource-group $resourceGroupName \
--account-name  $storageAccountName \
--enable-last-access-tracking false
Thanks for reading my post. I hope you find it helpful.
Check out this link for more information on optimizing costs through automated data lifecycle management.
