Hi, today I want to talk to you about Azure Application Gateway. This Azure resource is a web traffic load balancer that redirects traffic (HTTP or HTTPS) to specific resources in a back-end group. These resources can be NICs, virtual machine scale sets, public and internal IP addresses, fully qualified domain names (FQDN), and Azure App Service. In this post, I will show you how to deploy an Azure Application Gateway using Azure PowerShell. Once explained the characteristics of the Azure Application Gateway we can begin this tutorial.
Prerequisites
You created a Resource Group for these resources and the new ones deployed in this tutorial will join that group. If you want to know how to create a Resource Group, check out this
link.
You already created the necessary Virtual Network and subnet. If you want to know how to create a Virtual Network, check out this
link.
If you want to know how to install the PowerShell Azure module on your machine, check out this
link. The simplest way to get started is to sign in interactively at the command line.
Connect-AzAccount
This cmdlet will bring up a dialog box prompting you for your email address and password associated with your Azure account. If you have more than one subscription associated with your mail account, you can choose the default subscription. To perform this task, we will use the following commands:
Here, we define the characteristics of our environment and the resource’s properties.
#Define the parameters for the Azure resources.$location="northeurope"$resourceGroupName="RG-DEMO-NE"#Define the existing VNet information.$networkName="DEMO-VNET"
First, you should create a new subnet for the App Gateway instances, this subnet is only to be used by the App Gateway. Use the Add-AzVirtualNetworkSubnetConfig cmdlet with the following syntax.
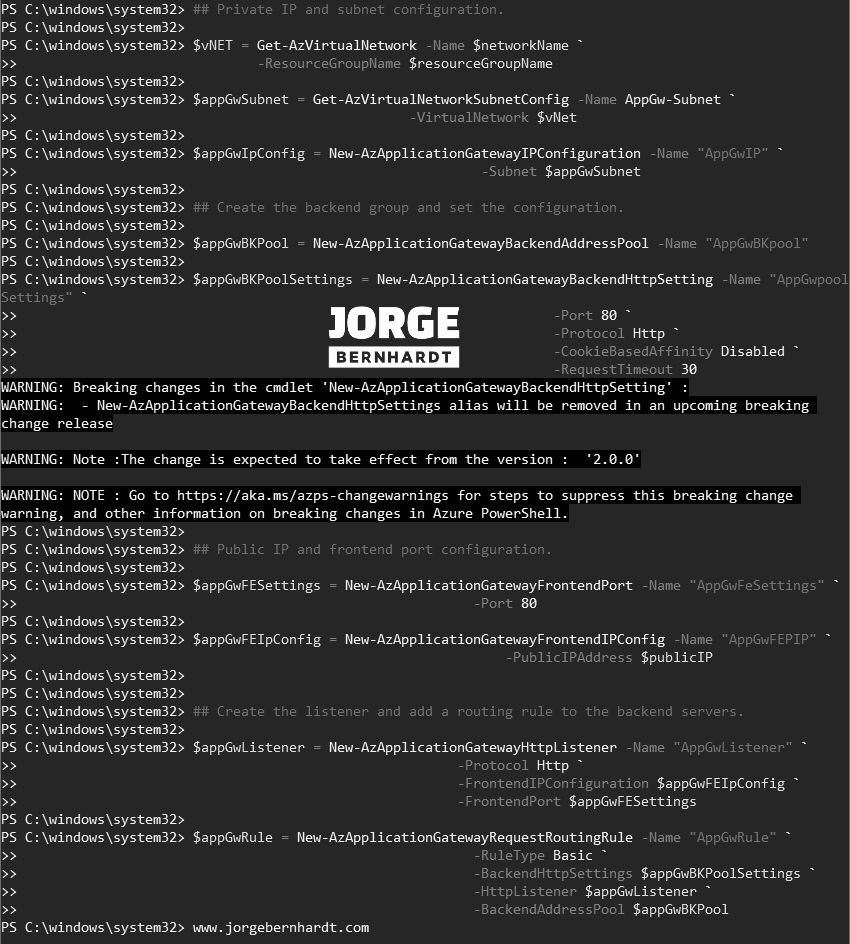
In this section, you will create the resources and configure the previous settings. As you can see, each of the following commands loads the configurations into variables that will finally be used in the creation of the Application Gateway.
\## Private IP and subnet configuration.$vNET=Get-AzVirtualNetwork`-Name$networkName`-ResourceGroupName$resourceGroupName$appGwSubnet=Get-AzVirtualNetworkSubnetConfig`-NameAppGw-Subnet`-VirtualNetwork$vNet$appGwIpConfig=New-AzApplicationGatewayIPConfiguration`-Name"AppGwIP"`-Subnet$appGwSubnet## Create the backend group and set the configuration.$appGwBKPool=New-AzApplicationGatewayBackendAddressPool`-Name"AppGwBKpool"$appGwBKPoolSettings=New-AzApplicationGatewayBackendHttpSetting`-Name"AppGwpoolSettings"`-Port80`-ProtocolHttp`-CookieBasedAffinityDisabled`-RequestTimeout30## Public IP and frontend port configuration.$appGwFESettings=New-AzApplicationGatewayFrontendPort`-Name"AppGwFeSettings"`-Port80$appGwFEIpConfig=New-AzApplicationGatewayFrontendIPConfig`-Name"AppGwFEPIP"`-PublicIPAddress$publicIP## Create the listener and add a routing rule to the backend servers.$appGwListener=New-AzApplicationGatewayHttpListener`-Name"AppGwListener"`-ProtocolHttp`-FrontendIPConfiguration$appGwFEIpConfig`-FrontendPort$appGwFESettings$appGwRule=New-AzApplicationGatewayRequestRoutingRule`-Name"AppGwRule"`-RuleTypeBasic`-BackendHttpSettings$appGwBKPoolSettings`-HttpListener$appGwListener`-BackendAddressPool$appGwBKPool
You will first need to set the SKU for the application gateway. Use the New-AzApplicationGatewaySku cmdlet with the following syntax. With this command, you set the size, the number of instances, and whether WAF is used.
Values accepted in the parameters: -__Name: Standard_Small, Standard_Medium, Standard_Large, WAF_Medium, WAF_Large, Standard_v2, WAF_v2.-Tier: Standard, WAF, Standard_v2, WAF_v2.-Capacity: Set the number of instances of an application gateway and finally, you can create an Azure Application Gateway using the New-AzApplicationGateway cmdlet with the following syntax.
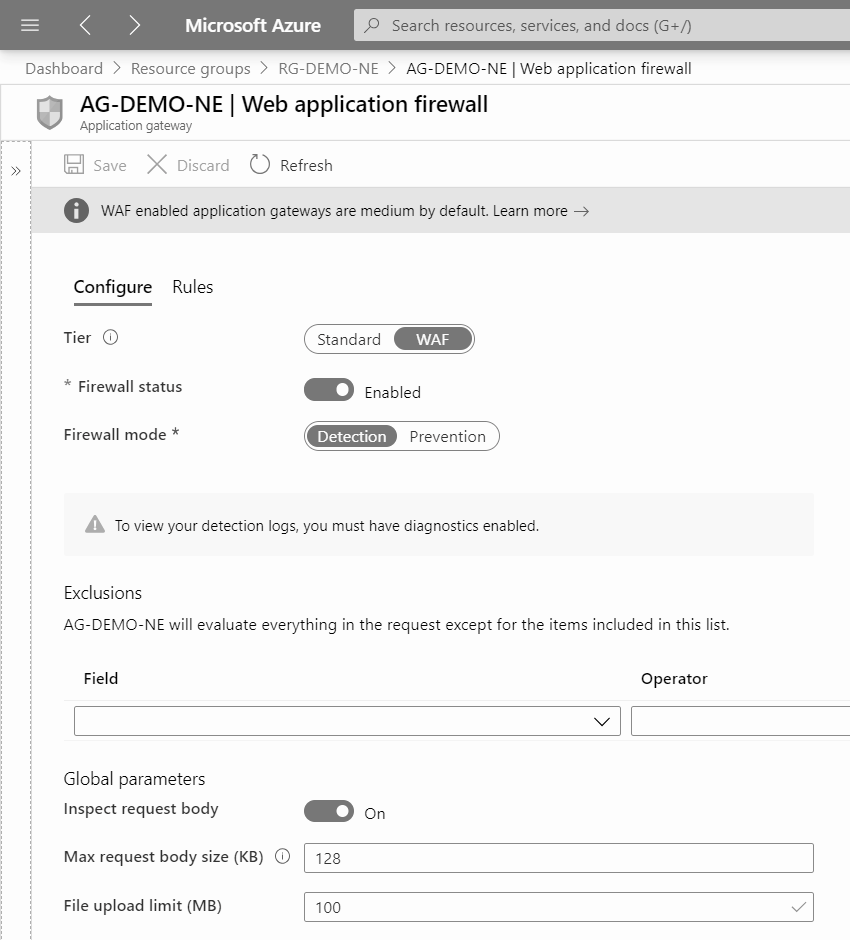
Once the Application Gateway has been created, you can enable the Web Application Firewall (WAF). To do this, you should use the Set-AzApplicationGatewayWebApplicationFirewallConfiguration cmdlet with the following syntax. This process will take approximately 20 minutes to complete.