How to deploy Azure VMs with Ephemeral OS disks
Hi, today I want to talk to you about the Ephemeral OS disks and how to perform the deployment of virtual machines with Ephemeral OS disks using Azure PowerShell. The Ephemeral operating system disks are created in local VM virtual storage, such as temporary disks, and are not saved in Azure Remote Storage. For this reason, virtual machines with ephemeral operating discs can be stopped but not deallocated. Another interesting feature is the possibility to fast reset or reimage VMs.
Other important characteristics of ephemeral disks are: #
- Support only managed OS disk.
- The Ephemeral Disks are compatible with all VM sizes of Premium storage.
- You can attach a managed data disk to a VM that uses an ephemeral OS disk
- The Ephemeral OS disks are free.
Features not compatible with ephemeral disks at the time of publication of this article: #
- Resize OS disk.
- Capturing VM images.
- Azure Disk Encryption
- Disk snapshots.
- Azure Backup
- Azure Site Recovery
- OS Disk Swap
Once explained the characteristics of the Ephemeral disks we can begin this tutorial.
Prerequisites
This tutorial assumes that you already have a Microsoft Azure account set up and you have the PowerShell Azure module on your machine installed. If you want to know how to install the PowerShell Azure module on your machine, check out this link. Assumptions:
- You created a Resource Group for these resources and the new ones deployed in this tutorial will join that group. If you want to know how to create a Resource Group, check out this link.
- You already created the necessary Virtual Network and subnet. If you want to know how to create a Virtual Network, check out this link.
The simplest way to get started is to sign in interactively at the command line.
Connect-AzAccount
This cmdlet will bring up a dialog box prompting you for your email address and password associated with your Azure account. If you have more than one subscription associated with your mail account, you can choose the default subscription. To perform this task we will use the following commands:
Get-AzSubscription
Select-AzSubscription -Subscription "My Subscription"
Once you set your default subscription, you’re ready to start.
Set the variables #
Here, we define the characteristics of our environment and the resource’s properties.
#Define the parameters for the Azure resources.

$location = "westeurope"
$ResourceGroupName = "RG-DEMO"

#Define the parameters for the virtual machine.

$computerName = "VM-DEMO-EOS"
$vmSize = "Standard_DS3"
$publisherName = "MicrosoftWindowsServer"
$offer = "WindowsServer"
$skus = "2019-Datacenter"

#Define the existing VNet information.

$networkName = "RG-DEMO-VNET"
$nicName = "NIC-"+$computerName
$vnet = Get-AzVirtualNetwork `
    -Name $NetworkName `
    -ResourceGroupName $ResourceGroupName

#Gets a credential object based on a user name and password.

$credential = Get-Credential
Azure Resource Deployment #
In this section, you create and deploy the virtual machine in Microsoft Azure with the features and properties previously declared.
#Create the Network Interface.

$NIC = New-AzNetworkInterface `
    -Name $nicName `
    -ResourceGroupName $ResourceGroupName `
    -Location $location `
    -SubnetId $Vnet.Subnets[0].Id


#Define the parameters for the new virtual machine.

$VirtualMachine = New-AzVMConfig `
    -VMName $ComputerName `
    -VMSize $VMSize

$VirtualMachine = Set-AzVMOperatingSystem `
    -VM $VirtualMachine `
    -Windows `
    -ComputerName $ComputerName `
    -Credential $Credential `
    -ProvisionVMAgent `
    -EnableAutoUpdate

$VirtualMachine = Add-AzVMNetworkInterface `
    -VM $VirtualMachine `
    -Id $NIC.Id

$VirtualMachine = Set-AzVMSourceImage `
    -VM $VirtualMachine `
    -PublisherName $publisherName `
    -Offer $offer `
    -Skus $skus `
    -Version latest
Set the operating system disk properties #
To use an ephemeral OS disk, use the Set-AzVMOSDisk cmdlet with the following syntax:
$VirtualMachine = Set-AzVMOSDisk `
    -VM $VirtualMachine `
    -CreateOption FromImage `
    -DiffDiskSetting Local `
    -Caching ReadOnly
Virtual Machine Deployment #
finally, we perform the deployment of the virtual machine, using the New-AzVM cmdlet with the following syntax:
New-AzVM `
    -ResourceGroupName $ResourceGroupName `
    -Location $location `
    -VM $VirtualMachine `
    -Verbose
Verify the deployment #
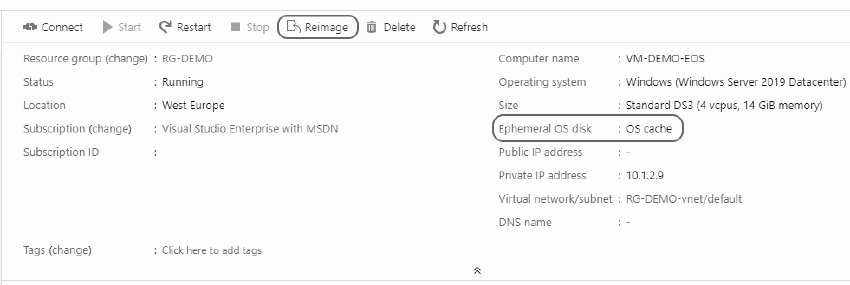
As you can see in the following screenshot, the deployment of the Ephemeral OS disk was successful and we have the reimage button to easily return the operating system to its initial state.

Thanks for reading my post. I hope you find it helpful.
If you want to know more about Azure Ephemeral OS Disks, check out this link.
