How to configure Storage Analytics metrics
Hi, Jorge is back. In this post, I want to show you how to configure Storage Analytics metrics using PowerShell and Azure CLI.
Azure Storage Analytics: performs logging and provides metrics data for a storage account. You can use this data to trace requests, analyze usage trends, and diagnose issues with your storage account.
Storage Analytics captures two types of metrics:
- Transaction metrics: For all types of storage (blob, file, queue, and table)
- Capacity and storage metrics: Only for Blob-type storage.
By default, the Storage Analytics service aggregates data by the hour, including API metrics, and the retention period set is 7 days, but if you want more control, you can also turn on metrics broken down by the minute. Important: The metric data is stored in a set of tables in your storage account. Once explained this feature, we can begin this tutorial.
Prerequisites
- This tutorial assumes that you already have a Microsoft Azure account configured.
- You can use an existing Storage Account, or you can create a new one. If you want to know how to create a Storage Account using PowerShell, check out this link.
Azure PowerShell Workaround #
If you want to know how to install the PowerShell Azure module on your machine, check out this link. The simplest way to get started is to sign in interactively at the command line.
Connect-AzAccount
This cmdlet will bring up a dialog box prompting you for your email address and password associated with your Azure account. If you have more than one subscription associated with your mail account, you can choose the default subscription. To perform this task, we will use the following commands:
Get-AzSubscription
Select-AzSubscription -Subscription "My Subscription"
Once you set your default subscription, you’re ready to start.
Set the variables #
Here, we define the characteristics of our environment and the resource’s properties.
$resourceGroupName = "RG-DEMO-WE"
$stoAccountName = "azstoragewe"

$stoaccount = Get-AzStorageAccount `
    -Name $stoAccountName `
    -ResourceGroupName $resourceGroupName
Get current metrics properties #
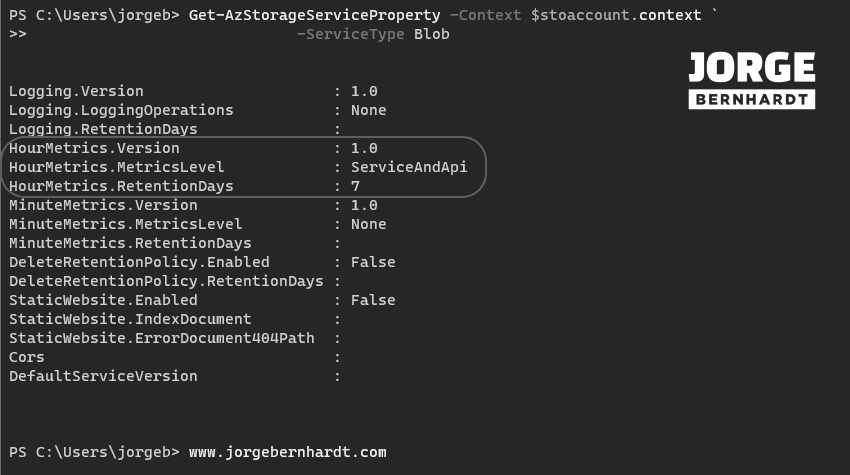
To get the current metric settings for each type of service. You should use the Get-AzStorageServiceProperty cmdlet with the following syntax. Using the -ServiceType parameter, you select the type of storage service for which you want to get the properties.
Get-AzStorageServiceProperty `
    -Context $stoaccount.context `
    -ServiceType Blob

Modify metrics properties #
If you want to change the metric settings, you must use the Set-AzStorageServiceMetricsProperty cmdlet. This command has several parameters that allow us to set all possible configuration options for the Azure Storage service.
- -ServiceType: Blob, Table, Queue, and File.
- -MetricsType: Hour or Minute.
- -MetricsLevel: None, Service, and ServiceAndApi.
- -RetentionDays: Set the number of days that the Azure Storage service retains metrics information (Minimum 1 and maximum 365, the value -1 means turn off the retention policy).
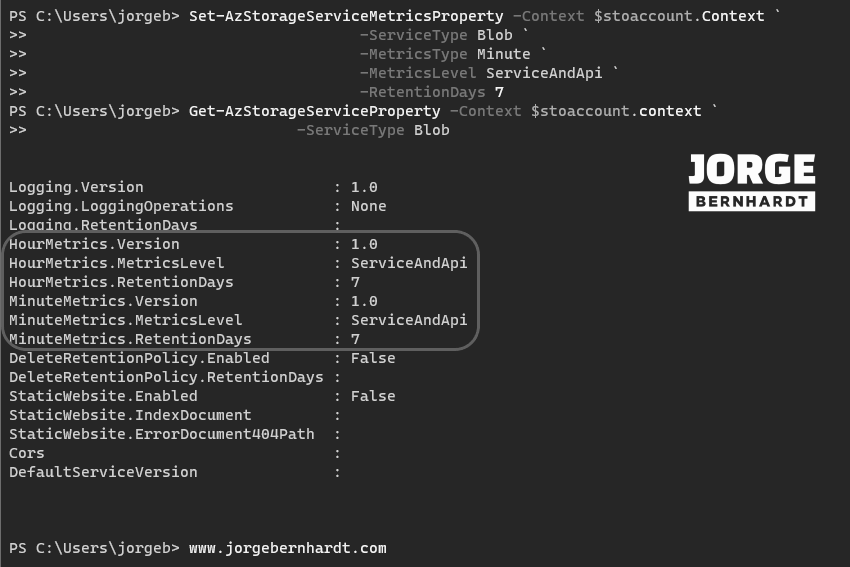
The following command enables the storage metrics of blobs per minute for the service and API levels and sets the retention of the metrics to 7 days.
Set-AzStorageServiceMetricsProperty `
    -Context $stoaccount.Context `
    -ServiceType Blob `
    -MetricsType Minute `
    -MetricsLevel ServiceAndApi `
    -RetentionDays 7

Set-AzStorageServiceMetricsProperty `
    -Context $stoaccount.Context `
    -ServiceType Blob `
    -MetricsType Minute `
    -MetricsLevel none `
    -RetentionDays -1
Azure CLI Workaround #
In this case, we will use Azure Cloud Shell, a browser-based shell built into Azure Portal. This allows us to use the Azure command-line tools (Azure CLI and Azure PowerShell) directly from a browser. If you want to know more about Azure Cloud Shell, check out this link. First, we define the characteristics of our environment and store the values in variables.
resourceGroupName="RG-DEMO-WE"
stoAccountName="azstoragewe"
Get current settings #
To get the current metric settings for all types of service. You should use the following command.
az storage metrics show \
--account-name $stoAccountName \
--output table

Modify metrics properties #
if you want to change the metrics settings, you should use the following command. This command has several parameters that allow us to set all possible configuration options for the Azure Storage service.
- --account-key: It must be used in conjunction with the name of your storage account.
- --services: b(blob), t(table), q(queue), and f(file).
- --hour: false, true
- --minute: false, true
- --Api: false, true
- --retention: Set the number of days that the Azure Storage service retains metrics information (Minimum 1 and maximum 365, the value 0 means turn off the retention policy)
In the following example, the command enables the storage metrics of blobs per minute for the service and API levels and sets the retention of the metrics to 7 days.
az storage metrics update \
--account-name $stoAccountName \
--account-key 000000000000000000000000000000000000000000 \
--services b \
--hour true \
--minute true \
--api true \
--retention 7
In Azure CLI, you can modify several ServiceTypes from a single command using the --services parameter, as shown in the following example.
az storage metrics update \
--account-name $stoAccountName \
--account-key 000000000000000000000000000000000000000000 \
--services bfqt \
--hour true \
--minute true \
--api true \
--retention 7
You should use the following command to revert the settings set in the above command.
az storage metrics update \
--account-name $stoAccountName \
--account-key 000000000000000000000000000000000000000000 \
--services bfqt \
--hour true \
--minute false \
--api true \
--retention 7
Thanks for reading my post. I hope you find it helpful.
If you want to know more about Azure Storage Analytics, check out this link.
