How to store the Terraform state file in Google Cloud Storage
When you start using Terraform to manage your cloud infrastructure, a key consideration is where to store the state file that Terraform generates to track changes to your infrastructure. While storing this file locally on your machine is possible, a more scalable and secure approach is to store it in a centralized location that your entire team can access.
In a previous article, I showed you how to store your state file in an Azure storage account. Today I want to show you another option, storing your Terraform state file in a Google Cloud Storage bucket.
This article will walk you through the steps to store your Terraform state file in a Google Cloud Storage bucket.
Prerequisites
- This tutorial assumes that your user account has permission to Cloud Storage and that access to the Cloud Storage API is enabled.
CloudShell Workaround #
In this case, I use Google Cloud Shell. Cloud Shell is a virtual machine provided to us by Google loaded with development tools, giving us command-line access to our Google Cloud resources.
Important: Please note that if you are using Terraform on your workstation. In that case, you must install the Google Cloud SDK, generate a service account key, and set the GOOGLE_APPLICATION_CREDENTIALS environment variable to the service account key path.
Create a local backend #
First, we will create a main.tf file, which will consist of three main blocks
- provider
provider "google" {
  project = "your-project-id"
  region  = "EUROPE-SOUTHWEST1"
}
The provider block is essential to any Terraform configuration file, as it establishes the connection to the infrastructure provider and allows Terraform to interact with resources on the target platform, in this case, Google Cloud.
- google_storage_bucket
resource "google_storage_bucket" "terraform-bucket-for-state" {
  name                        = "bucket-dev-eu"
  location                    = "EUROPE-SOUTHWEST1"
  public_access_prevention    = "enforced"
  uniform_bucket_level_access = true
  versioning {
    enabled = true
  }
  labels = {
    "environment" = "jorgebernhnardt"
  }
}
In the google_storage_bucket block, we define and configure a Google Cloud Storage bucket with all the features and configurations that suit our needs.
- terraform
  backend "local" {
    path = "terraform/state/terraform.tfstate"
  }
}
The Terraform block configures global options for Terraform and its backend. As you can see, we define that the state file is stored locally and indicate the path where it is located.
Below you can see the final result of the main.tf file.
provider "google" {
  project = "your-project-id"
  region  = "EUROPE-SOUTHWEST1"
}
resource "google_storage_bucket" "terraform-bucket-for-state" {
  name                        = "bucket-dev-eu"
  location                    = "EUROPE-SOUTHWEST1"
  public_access_prevention    = "enforced"
  uniform_bucket_level_access = true
  versioning {
    enabled = true
  }
  labels = {
    "environment" = "jorgebernhnardt"
  }
}
terraform {
  backend "local" {
    path = "terraform/state/terraform.tfstate"
  }
}
Initialize configuration #
Once we have saved the content of our main.tf file, we execute the following commands.
-
Run the terraform init command to perform several initialization steps that prepare the current working directory for use with Terraform.
terraform init -
Use the terraform validate command to check whether your configuration is valid.
terraform validate -
The terraform plan command creates an execution plan, allowing you to preview the changes Terraform plans to make to your infrastructure.
terraform plan -
The terraform apply command executes the plan created in the previous step and applies the changes to each resource declared in our configuration file. It prompts for confirmation before making any changes, unless you explicitly use the -auto-approve switch to skip approval.
terraform apply -auto-approve -
The terraform show command is used to inspect the current state file as seen by Terraform.
terraform show
Migrate state to a Cloud Storage backend #
Once the previous steps have been executed correctly, we can now migrate our state file to our newly created bucket. To do this, we need to modify the terraform block to set the new location of the terraform state file.
-
bucket (Required): The name of the GCS bucket that we will use, in our case the one we defined and created in the previous step.
-
prefix (Optional): The state file is stored in an object named
/ .tfstate.
terraform {
  backend "gcs" {
    bucket  = "bucket-dev-eu"
    prefix  = "terraform/state"
  }
}
Below you can see the final result of the main.tf file.
provider "google" {
  project = "your-project-id"
  region  = "EUROPE-SOUTHWEST1"
}
resource "google_storage_bucket" "terraform-bucket-for-state" {
  name                        = "bucket-dev-eu"
  location                    = "EUROPE-SOUTHWEST1"
  public_access_prevention    = "enforced"
  uniform_bucket_level_access = true
  versioning {
    enabled = true
  }
  labels = {
    "environment" = "jorgebernhnardt"
  }
}
terraform {
  backend "gcs" {
    bucket  = "bucket-dev-eu"
    prefix  = "terraform/state"
  }
}
Initialize the backend #
Using the following command, we initialize the backend again and automatically migrate the state to the new location.
Important: This action will ask us for confirmation to continue.
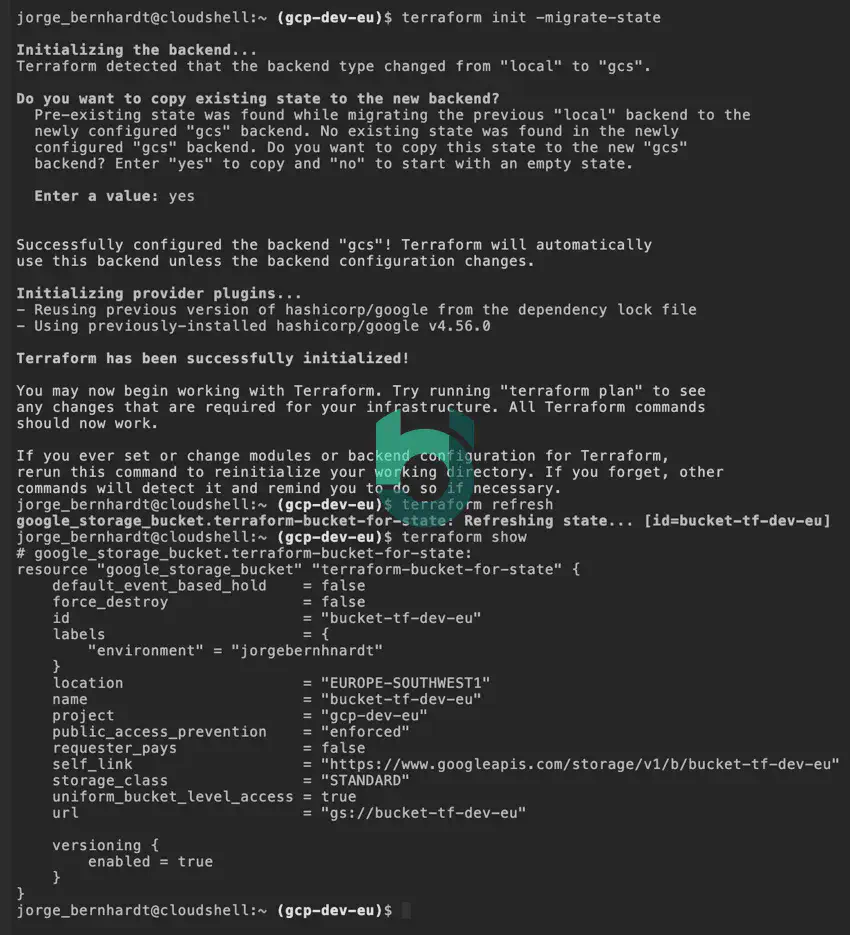
terraform init -migrate-state
Refresh the state #
The following command reconciles the state known to Terraform through the state file with the deployed infrastructure. This will not modify the infrastructure but change the state file.
terraform refresh
Check #
The following command provides a human-readable output of the current state file. In this way, we verify that its content is as we expect.
terraform show
If you want to learn more about Terraform backends, check out this link.